I had read all of the feedback before buying this. Most of it seemed shipping related or installer related. One needs to set their expectations appropriately when purchasing something like this. It's not a toaster or a countertop microwave where you should just expect to unbox it, not read anything, and go with no hassles. It is more like buying tile or wallpaper. It is a part of a project and requires some knowledge and skills to properly install it and get the best experience. Do not expect you will just be able to slap it in and go.
On the note of the bent fans... Mine were VERY slightly bent, or better put, out of true. Sort of like if you hit a rock or curb and it throws your bike wheel off a bit. It is pretty easy to get them near perfect and "close enough" works for a quiet fan without vibration. Some of the vibration is also due to mounting. You should have a nice solid mounting for this and that brings me to that point... The mounting holes are very near the edges of this unit. My cabinets that I mounted them to have particle board bottoms that are MAYBE 1/4 inch thick. There was no way I was going to just screw into that even with smallish washers, no way... Also, the slots / holes in the unit, do not allow for decent sized screws (that said this comes with ZERO mounting hardware so expect a trip to the hardware store). If you wanted to just get hardware and go, you would be putting a good deal of faith in thin sheet metal and particle board. You may have nicer cabinets.. That said... I used a vibrating multi tool to deepen the slots my cabinet floors slid into so I could sneak 1.25" fender washers into, thus allowing the fan to grip the body of the cabinet (1/2 particle board). I used a slightly larger drill bit to make the slots in the hood for the screws a little wider so I didn't have to use very small screws. I also added plastic spacers between the unit and the floor of the cabinet so the bolt tension was not pulling on the sheet metal at all, but instead squeezing it firmly against the spacers and cabinet, forming a very solid connection. This made install a serious PAIN, but it was one I more or less expected. Again, expectations...
On the lighting issue, their customer service was AWESOME. I emailed about the lights being very dim, really only good as "night lights" and they mailed me a new set quickly. Ask and ye shall receive. The bad news is the replacements are maybe twice as bright, still not very bright, and still something a smidge bluer than daylight white. Oh well. They help fill out the light blocked by the hood and I'm not going to whine. I would DIY but the circuit that controls them only supports 2w, so this is really the best you can do without really getting in there and doing some modifications.
On the fan vibration issue, I found out the fix for that when I answered the follow up email they sent after helping me with the lights. Again, their customer service, for me anyway, was awesome. Thanks guys for that! It only took me about 15 minute to fix it by removing the filters, the oil cup, and the fan shroud come off with three little quick releases you twist 90 degrees then the shrouds pull down, rubber tubes come out of the housing, and they pull out. Hold you finger against the body of the fan blower assemble and fingertip very close to the rim of the fan blade (the smooth part) and turn the blade slowly until it contacts your finger. That is the high spot. Gently push inwards on that part and turn some more.. keep repeating this process until there is no, or nearly no, high spots... Spin it up on low speed and keep your fingers away while you quality check. Thing is, these blade are very thing. If they made them thicker it would mean more rotating mass which means bigger motors or slower fan speed up, and likely more wattage draw. So they can get a little wonky during shipping. I imagine these came from China, likely assembled, so all things considered it arrived in awesome shape... What is 15 minutes of work right? It's a $300 hood that rivals $1500 ones!
The next thing, and what I really love, is the power of this unit. Someone commented they are Indian and make stinky food... Love that! I am not Indian but I cook a lot, grill on my cast iron which always set off the smoke alarm (no longer!!!) and do make some aromatic foods. My house no longer smells like bacon all day Sunday (and hey if that's awesome just don't run it right??). While all this fantastic ventilation is happening, you CAN HOLD A CONVERSATION over by it, and I can have it on low sucking up the smells while I go sit down and watch a movie on the other side of my open concept kitchen / living room and it isn't bothersome! To put that in perspective, my crappy GE over the range microwave this replaced, was from 2007 and is that unit that like everyone and their mom and every apartment and hotel room has, only did 200 cfm on low and I think maybe 400 on high (but that is totally bogus!) and you couldn't talk anywhere near it because of how loud it was... I also love the timed shut off feature, just hit the button and walk away and it runs for like a minute or so then shuts itself down.
So all in all, I think this unit is a GREAT value for the money. I'm very pleased with its performance, nice modern unobtrusive appearance, BV's customer service, and I would highly recommend to anyone willing to spend a little time doing a good installation. Take some care, pay attention to the details, plan on this taking a few hours to really do right, and have a helper hold it while you get it mounted. Or, you know, buy a 1500 hood and pay someone a few hundred bucks to do it for you.
PS: I added some stainless sheet using epoxy to the inside parts of the cabinet prior to mounting and while I put up the backsplash in the picture. This not only really makes it look that much more pro but it will be way easier to clean. Just a project idea for you there... got the piece here on amazon for like $15 a side and only had to trim one inch off either one for a perfect fit.
The hood came without any dents or dings and looks great. It was really easy to install. I installed underneath a cabinet with the provided hardware. It also comes with hardware to attach it to the wall behind the unit. I cut through the cabinet and outside wall.
FYI. This unit does not have a recirculate option and you need to vent it outside.
It pulls a lot of air. I don't have any return air specifically for this unit but it still works great. I am able to stir fry at high temps or deep fry without smoking out the house!
Within minutes of complaining about the lights, I received this reply from the manufacturer:
"We actually have brighter lights for you to replace. The new light that we are sending you is twice bright as the existing one."
I've only owned this hood range for a couple weeks now, but it looks very sleek and industrial if that's what you want. The grates look easy to clean and lights are really bright. Even on the lowest fan setting, it can hold a piece of paper in front of the grates.
I wonder why they only supplied 2 rubber rings to attach to the bottom and not 4 for the top too. It made it uneven so I opted out of using them. The sticker that comes off the front left some adhesive, so I had to use some Goo Gone to remove it.
This is definitely a two man installation, so if you're installing it yourself, plan for having someone help.
This hood is good, not great. It is quiet and powerful but it's lights are the worst that LED's can be. Dim and very harsh white. Also when the hood arrived it's fan blades were bent and I had to straighten them before it would run without rubbing. Dealing with customer service and the manual it came with was pretty rough. The first two people I talked with didn't even know they "made" this product! Since then it has run fine. Also it is not branded "BV" but "Live Tec". If you have the money for a name brand model or want a hood that will last I would not suggest this one. If you're broke and need a decent hood that will likely last a few years before becoming garbage due to the lack of parts or customer service and the lighting in your kitchen is already good then this will fit the bill.

Feature Product
- Easy-to-Clean and Dishwasher Safe Baffle Filters - Featured stainless steel baffle filters. They are easy to remove and dishwasher safe!
- Worry-free Guarantee ETL Rated. 2-year Product Warranty Protected - Backed by BV 30 days Money Back Guarantee with 2 years warranty.
Description
Easy to Disassemble for Cleaning
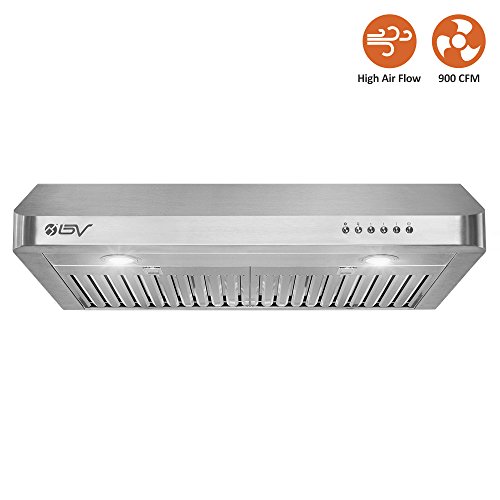
This BV range hood is a high airflow ducted unit with lights and stainless steel baffle filters.
The entire range hood is designed with easy removal and cleaning of parts, without specialized tools required.
900CFM High Power
The range hood provides up to 900 CFM while outputting 7.5 sones at max fan speed.
Specifications :
- Exact Dimensions (L-W-H): 29.5" x 19.5" x 6"
- Materials: Seamless Stainless Steel, Satin Finish
- Power Rating: 120V/60Hz (USA & Canada standard)
- General Input Power: 156W
- Motor Input Power: Max. 150W; Min. 110W
- Levels of Speed Control: 4-speed electronic button control
- Airflow (Q/L/M/H): 385 CFM/ 490 CFM/ 615 CFM/ 900 CFM
- Noise Level (Q/L/M/H): 1.5 Sone/ 3.5 Sone/ 5.3 Sone/ 7.5 Sone
- Number of Motors: 2
- Motor Type: Single Chamber Ultra Quiet
- Fan Type: Centrifugal Blower
- Filtration Type: Stainless steel baffle filters
- Illumination: 2x 3W 12V LED lights
- Venting Size: Top, 6" Round
- Interference Protection: Radio Frequency Interference Protected
Shop with confidence
BV is continuously improving and evolving for our customer needs. Our goal is your 100% satisfaction.
We offer every customer a limited 2-year product warranty on every item purchased
We are very pleased with this range hood. Its easy to use and does a fantastic job of moving smoke and odors to the outside. Even when we run it on high, it doesn't interfere with conversations..
I'm adding a picture in response to a question about covering this with a custom hood cover.
Just installed the BV yesterday. Packaging was awesome. The box was so heavy that I originally thought installation was going to be a pain. But after taking it out of the box we realized much of that weight was the packaging. The unit itself is very manageable
As for installation, the instructions were worthless. Don't even bother reading them..... they'll just confuse you. Just look at where the exhaust hole needs to be and where the plug is going in and create holes accordingly. Then just screw it in or bolt it or whatever. It's that simple
One suggestion. I saw in one review that somebody attached a straight extension for the exhaust by screwing it in after drilling holes in the extension. We did that and it was very helpful.
The fans are very quiet and the unit appears to be very well made. The only reason I am giving it 4 stars is the light seems to be weak and at a light spectrum I don’t like
We bought this to replace an OTR microwave that didn't suck up anything. Seriously, if we did anything more than boil water, our smoke alarms would go off. So we bought this to keep ourselves, and our two dogs, from going insane each time we so much as looked at the stove.
This took me and my husband all weekend to install, including 4 trips to Lowe's. We took down our microwave and realized it had a rectangle output, so we had to get some ducting from the main vent to this. Part of the reason it took so damn long was because of the way the builders installed the vent stack to begin with, so not the fault of this hood. However, there are a couple things to note as I found the instructions less than stellar. Some of these might only apply if you're doing an under-cabinet mount.
1. There are two small screws on the top vent. Remove these before installing. No mention of this in the instructions, but it can be difficult to maneuver the extraction once the hood is installed. Trust me. The duct should slip between the two cylinders on top and then you screw them all together. Yeah that didn't happen. We just used shiny ducting tape to keep it all in place.
2. You might want some nuts for the screws that go in the top. We actually installed it with the screws coming down from the cabinet and added nuts to keep them all in place. That was easier than trying to go the other way.
3. Make a template of the screw holes in the back and another for the holes on top from the cardboard box the hood is shipped in. Ideally templates would have been provided, but we were able to make do.
4. As others have mentioned, the sticker on the front left some lovely residue. Even after using goo gone, I could still see the outline. The way I got rid of it was by cleaning the hood with vinegar and then wiping it down with a thin coat of olive oil. No trace of the sticker now!
Tonight we put this fan to the ultimate test. I seared chicken thighs for about 10 minutes before transferring to the oven, made a glaze from the leftover juices plus some other ingredients, and stir fried snap peas. I don't think I could have done even one of those things before without setting off the smoke alarm, but this hood allowed me to do all three with no worries.
One day I hope my dogs will get over their trauma and not run and hide every time we turn on the stove. Overall, I'm super happy with this hood as the memories of installing it quickly fade.
Quiet operation, moves adequate air for odor, steam and smoke removal.. Only two faults I can find, one is the installation warning sticker on the face of the hood left a glue residue, still have not removed all of it even with a lot of elbow grease and the second is the mounting hardware and location of mounting holes. I had to go to the hardware store to pick up #10-32 machine screws and nuts to mount the hood under my upper cabinet above the stove. The holes are located in such a small confined space I could not fit my hand in the space to install the nut and washer, had to have my wife do this task. I would recommend revising the mounting hardware and system.
A substantially solid design of near commercial grade, this range hood features two linearly mounted high power fans allowing even and thorough suction of steam and cooking odors from your range or cooking surface. I found the heavy gauge stainless steel is remarkably strong and resilient to impact and scratches, and the modular design is well thought-out for easy cleaning and maintenance. A good example are the three removable vent panels which are angled towards the rear, to permit any oil or grease to flow towards a removable collection tray that is easily un-clipped. This is by far, better than my earlier range hoods which were more difficult to clean. The LED lights, in my estimation, offer greater advantages over other alternatives, such as Quartz Halogen lights. They offer even illumination and will virtually last forever without needing replaced.
If you pay close attention to mounting instructions and matching diameter of the exhaust port to this range hood, you will be rewarded with excellent suction and air-handling capabilities.
Lastly, I cannot provide enough praise for BV STAINLESS' customer service. I contacted them about the operation of my unit, and they were quick to respond and to work with me in trying to rectify the concerns. It still required some adaptation on my part, but the quality of their customer service is among the best I have received from any company in the past 20 years!
As a result, I could not recommend the BV Stainless Steel 30" Under Cabinet range hood, any more highly. Buy it... you won't be disappointed!
0 comments:
Post a Comment